

Every online store needs a reliable way to create invoices. Whether you’re running a small business or managing multiple locations, having an efficient invoice system helps you maintain accurate records and provide professional documentation to your customers.
WooCommerce can create invoices through its built-in features or with specialized plugins. The platform offers basic invoice generation for simple needs, while plugins like BizPrint provide advanced features such as automatic printing, customization, and bulk generation capabilities.
In this article, we show you how to create and send invoices to customers in WooCommerce. We’ll guide you through generating both electronic and physical invoices, whether for sending to customers or keeping business records. You’ll learn about different invoice creation methods, from WooCommerce’s built-in features to automated solutions that save time and reduce errors.
Ways to create WooCommerce invoices
Store owners can choose from several approaches to generate invoices:
- Built-in WooCommerce features: Generate basic email invoices – perfect for small stores with simple needs. These tools handle essential invoice creation but offer limited customization.
- PDF invoice plugins: Create professional PDF invoices with enhanced formatting options. These solutions suit growing businesses needing more polished documentation.
- Automated solutions: Use tools like BizPrint to combine invoice generation with automatic printing and advanced features. This approach works best for businesses processing multiple orders or operating across different locations.
Creating basic invoices with WooCommerce’s built-in features
WooCommerce includes basic invoice features that help you manage simple billing needs. While these tools provide essential functionality for small businesses, understanding their limitations is crucial for your business growth.
Step-by-step invoice creation
Creating an invoice with WooCommerce’s built-in system takes just a few minutes, but you must do it manually:
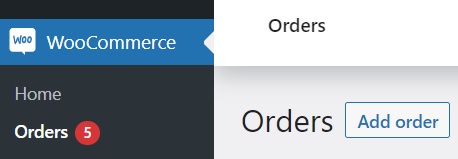
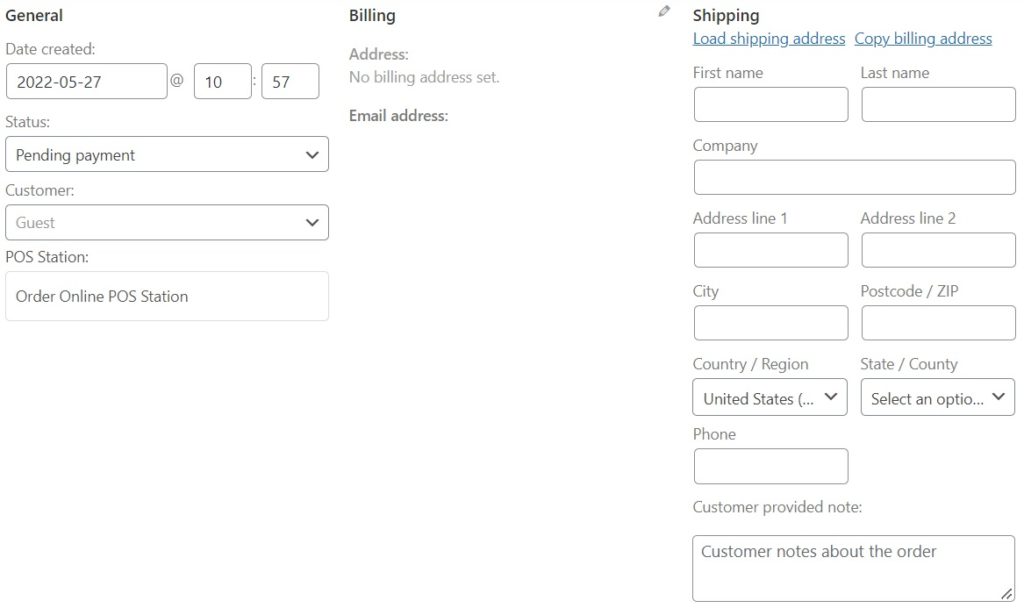
1. The first step in generating an invoice is to create a corresponding order in WooCommerce. To do this, create a new order by going to the ‘Orders’ page – WooCommerce > Orders > Add Order or choose an existing order.
2. Enter the customer’s email address and billing details – these are essential for proper delivery and record-keeping. For physical products, include shipping information.
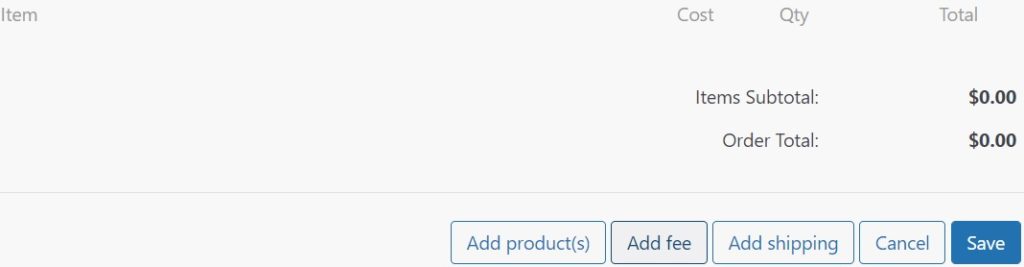
3. Click ‘Add line items’ and input the fee or products to be shown on your invoice. Add a description for each line, then click ‘calculate total’. The built-in calculator helps determine the total, including taxes and shipping fees.
4. Go to the ‘Order actions’ drop-down menu and select ‘Email invoice/order details to customer’.
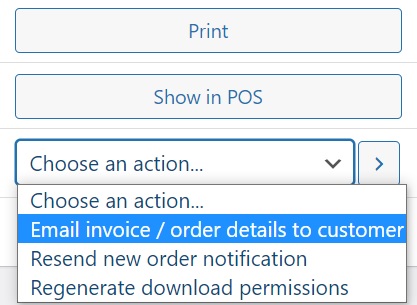
5. Now, save your new order. At this point, your invoice will be generated with its unique invoice number, and it will automatically be sent to the customer by email.
Best use cases
The default WooCommerce invoice system works best for stores with basic invoicing needs. The system handles straightforward transactions where extensive customization isn’t required, such as simple product orders with standard pricing and shipping options. It’s particularly suitable when you need basic email invoices and don’t require specialized formatting or branding.
Understanding the limitations and risks
Research shows that small and medium-sized businesses spend an average of 120 working days per year on administrative tasks. With WooCommerce’s default system requiring manual invoice generation for each order, this administrative burden can grow significantly as your business scales.
The manual process affects more than just time management. According to Deloitte, businesses often struggle with invoice accuracy and timeliness:
“Some [businesses] make consistent invoice errors regarding units of measure, price, customer accounts or other inaccurately reflected master data. Some fail to generate invoices in a timely fashion – or at all.”
These delays and errors can severely impact your cash flow – a critical concern when 82% of all businesses fail due to weak cash flow management. The built-in system’s constraints include:
- Time-consuming manual creation for each invoice.
- No automatic PDF generation.
- Basic customization options for branding.
- No bulk processing capabilities.
- Increased risk of human error.
As your business grows and these limitations begin to affect your operations, you’ll need a more robust solution. Let’s explore how to create professional invoices with BizPrint, which addresses these challenges while adding powerful automation features.
Creating professional invoices with BizPrint
For businesses facing the limitations of WooCommerce’s basic invoice system, BizPrint offers automated solutions that save time and reduce errors. With both automation and customization options, you can create professional invoices that reflect your brand while streamlining your workflow. But, first, let’s focus on setting up and using BizPrint for efficient invoice creation.
Setting up BizPrint
Getting started with BizPrint takes just a few steps:
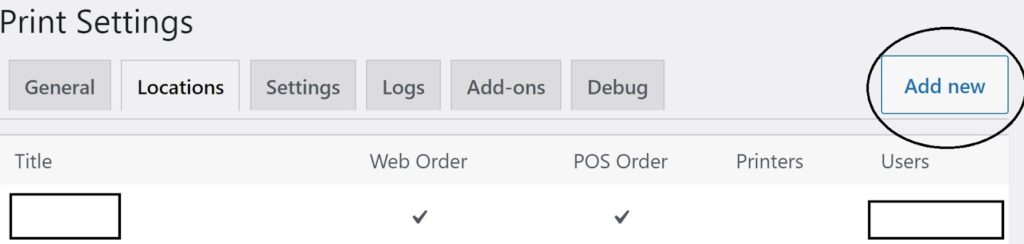
- Go to ‘WooCommerce > Print Settings > Locations’ and click ‘Add New’.
- Create a BizSwoop account and download the plugin.
- Install and activate the plugin in WordPress. You can have the plugin up and running in just a few simple steps. We have a handy BizPrint quick start guide for reference.
- Add your location title, for example, ‘invoice print’.
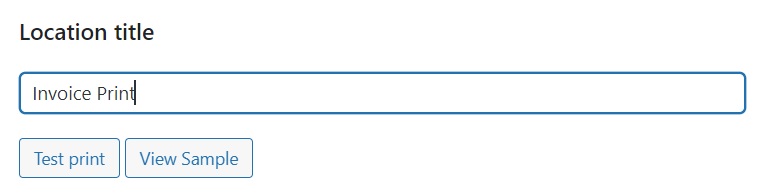
- Select your preferred printer; you’ll have connected this during the plugin setup process.
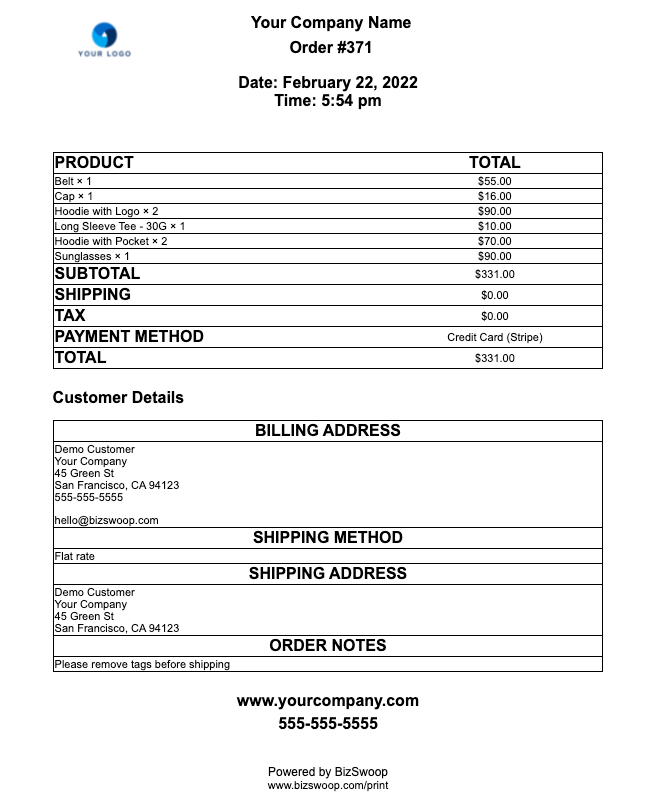
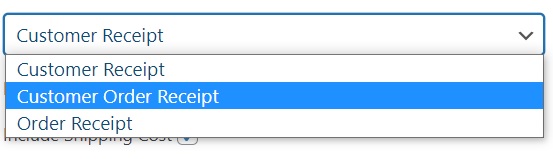
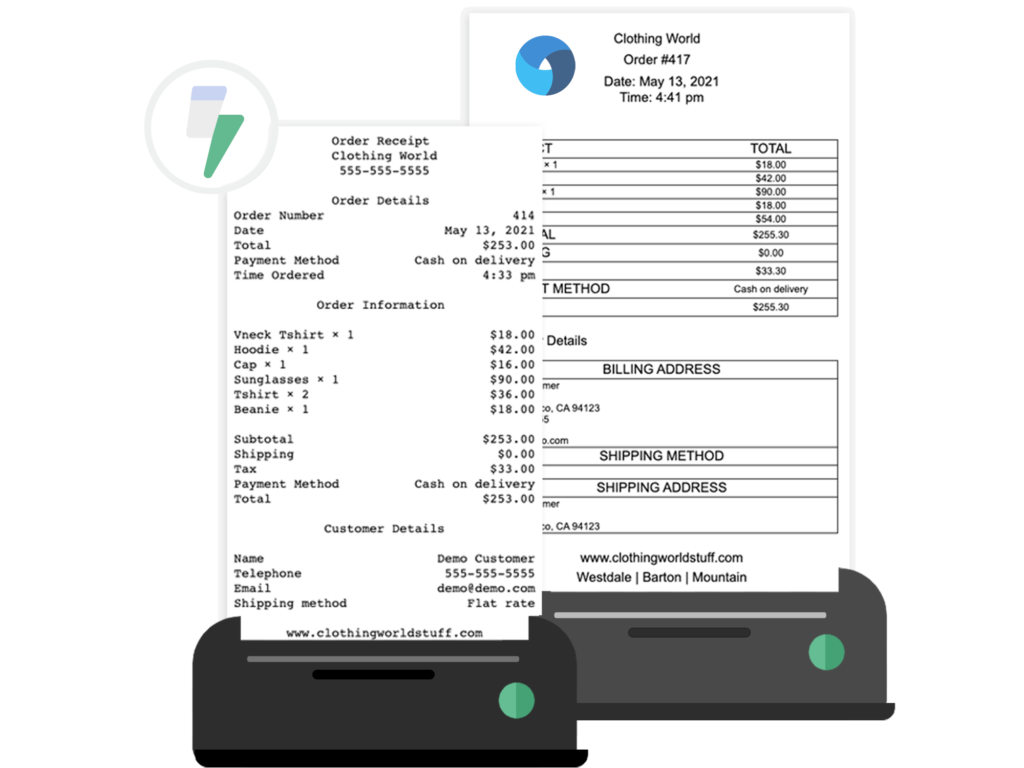
- Choose the ‘customer order receipt’ template, which contains all the fields required for customer invoices such as invoice number, an itemized list of products, invoice totals, customer billing address, and shipping address.
- That’s it! Just head over to the WooCommerce > Orders section of the Print Manager plugin to see a list of WooCommerce orders, with corresponding invoices for each one!
While WooCommerce offers one basic template, BizPrint lets you create branded invoices that reflect your business identity. Add your logo, tax rates, and personalized notes with consistent formatting across all documents. For complete customization options, check out our guide to custom WooCommerce invoices.
Automating invoice creation
BizPrint transforms your invoice workflow by automatically generating documents when orders are placed. Enable automatic printing to:
- Generate invoices instantly for new orders.
- Process multiple orders simultaneously.
- Maintain consistent formatting.
- Reduce manual data entry errors.
In the Print Manager plugin window, go to WooCommerce > Print Settings > General and find ‘enable automatic order printing’.
If you check this box, BizPrint will automatically print invoices to your desired printer location whenever a new order is made – an incredibly useful feature for brick-and-mortar stores.

If you leave the box unchecked, you can print orders manually in the WooCommerce > Orders section of the plugin, where you’ll see a list of your orders and invoice numbers.

Flexible printing options
Print to physical printer:
Connect any standard printer to automatically produce hard copies, from Point of Sale (POS) receipt printing to customer invoices. Create and print various business documents, including receipts, delivery notes, pick lists, packing slips, shipping labels, and credit notes. BizPrint works with your existing hardware, requiring no special equipment.
Generate PDF files:
Create digital copies of invoices that can be:
- Saved to your local computer.
- Stored in Google Drive or Dropbox.
- Emailed to customers.
- Archived for business records.
If you want to print to PDF automatically, use this quick start guide to install and activate BizPrint. You can then set up your PDF auto printer.For this, you’ll first need to install the BizPrint cloud app. Then click on ‘Set Up PDF Printer’, and select the PDF directory. It will show the PDF invoices in your local computer directory or a connected Google Drive or Dropbox folder, which you can then open and print.
Print WooCommerce Order Receipts, Invoices & Labels
Automatically print from WooCommerce straight to your printer.
Advanced invoice features for growing businesses
As your business expands, BizPrint’s advanced features help you scale your invoice management efficiently. Here’s how you can use them:
Bulk invoice generation
Save hours of work with bulk processing. Instead of clicking through orders one by one:
- Process your morning’s rush of orders all at once.
- Generate invoices for all daily orders before closing.
- Print tax documentation for multiple orders in a single click.
- Create invoice batches for specific customer groups.
For example, if you receive 50 orders during your morning rush, generate and print all invoices in one batch while you prepare orders, rather than handling each separately.
Multi-location printing
Run multiple locations smoothly with targeted printing:
- Print food orders directly to your kitchen printer.
- Send shipping labels to your warehouse printer.
- Generate customer receipts at your front counter.
- Produce packing slips in your fulfillment area.
Set up rules like “all coffee orders print to the barista station” while “food orders print to the kitchen.” Or direct wholesale invoices to your office printer while retail receipts print at the counter.
Automated workflows
Remove manual steps from your process:
- Print invoices instantly when customers complete checkout.
- Automatically generate end-of-day reports at closing time.
- Create delivery notes when orders are marked ready for shipping.
- Print customer copies and filing copies with different formats.
For instance, set up your system to print two copies of each invoice – one formatted for customers and one for your accountant – without any extra clicks.
Automated invoice updates/notifications
Flow Notify, BizPrint’s companion notification plugin, enhances your customer communication by automatically sending updates about orders and invoices. The plugin sends SMS, email, or WhatsApp messages based on order status changes, letting you:
- Alert customers when their invoice is ready.
- Send shipment notifications with invoice attachments.
- Request reviews after order completion.
- Keep your team updated on invoice status.
BizPrint and Flow Notify work together to keep both your team and customers informed throughout the order process.
With these advanced features in mind, let’s examine how to choose the right invoice solution for your business needs.
Choosing the right invoice solution for your business
Your choice of invoice solution should align with your business operations. Here’s what to consider:
Business size and order volume
If you run a small coffee shop processing 5–10 online orders daily, WooCommerce’s built-in features might serve you well. You can manage basic email invoices during quiet periods between customers.
However, if you’re running a busy restaurant taking 50+ online orders daily, or managing a retail store with multiple locations, BizPrint offers significant advantages. For example, during lunch rush, orders can print automatically to your kitchen while invoices generate simultaneously – no staff member needs to manually process each one.
Feature requirements
Consider your daily operations:
Basic WooCommerce suits a simple setup. A local bookstore, for instance, might only need email invoices for occasional online orders.
BizPrint shines in more complex situations:
- A restaurant can print kitchen tickets, customer receipts, and delivery invoices automatically to different printers.
- A warehouse can generate bulk invoices for all morning orders at once.
- A retail chain can manage invoices across multiple store locations from one dashboard.
- An online store can automatically save PDF copies of every invoice for end-of-year. accounting
Cost analysis
Let’s look at real numbers: If your staff spends 30 minutes daily manually creating invoices, that’s 15 hours monthly of administrative work. Add the cost of fixing errors (like missing invoices or incorrect amounts), and the time spent searching for specific invoices during tax season.
BizPrint’s pricing adapts to your business volume. A growing cafe might start with the basic plan for 100 prints monthly, while a busy restaurant chain can scale up to unlimited printing across multiple locations.
Start creating professional WooCommerce invoices today with BizPrint
Stop spending hours manually creating invoices and start automating your process with BizPrint. Whether you’re managing a growing restaurant, scaling your retail business, or running multiple store locations, BizPrint adapts to your needs:
- Generate invoices automatically as orders come in.
- Print to any existing printer in your business.
- Create professional PDF invoices for digital storage.
- Process multiple orders at once during busy periods.
- Keep your customers informed with automated notifications.
BizPrint integrates directly with WooCommerce, requiring no special hardware or technical knowledge. You can set it up in minutes and start saving hours of administrative work immediately.
Print WooCommerce Order Receipts, Invoices & Labels
Automatically print from WooCommerce straight to your printer.
Try BizPrint out for yourself to see how it can help take your eCommerce store to the next level! Start streamlining your invoice process today and focus on what matters most – growing your business.
BizPrint is both an invoice generator and a printer for WooCommerce. With the plugin, you can print invoices as needed to cater to customers that want both physical and digital copies of invoices.