


For restaurateurs, retailers, or WooCommerce store owners accepting online orders, it’s useful to print customer orders and purchase receipts to help staff keep track of orders and provide customers with proof of purchase.
However, such receipts can quickly delay workflows, especially if you’re printing them manually or taking receipts down by hand during a telephone order. Needless to say, auto-printing goes a long way to unblocking bottlenecks so that you and your team can work more productively.
WooCommerce doesn’t come with built-in auto-printing features. In this post, we’re exploring how you can auto print WooCommerce orders at any time, from anywhere, using a plugin called BizPrint.
Why Is Auto Printing Vital to Your Business?
There are several benefits to auto printing WooCommerce orders:
- Automated custom receipts provide a better customer experience for in-person shoppers because they don’t have to wait long for proof of purchase.
- Auto printing online WooCommerce orders cuts down on manual work, saving time that can have a high opportunity cost in your business. A packing slip that’s automatically printed is an order that can be processed much faster.
- With a physical receipt immediately in hand, auto printing receipts ensures no order is forgotten. This is especially important for busy restaurants needing concise orders sent to their kitchen staff: auto-printing straight to the kitchen ensures no order gets lost.
What to Look for in a Printing Service
In a world ruled by online convenience, any high-quality auto printing service should facilitate faster order processing. Your solution should be able to print orders to all the locations you need, whether that’s warehouses, fulfillment stations, kitchens, bars, or your office. Getting the order printed automatically makes it easier to provide invoices, provide customer receipts, and/or fulfill orders immediately after an order is placed.
Few third-party WooCommerce plugins offer this kind of comprehensive auto printing service. Many solutions require several pieces of software to establish an effective workflow. Or, worse, they require expensive dedicated printing equipment!
Your ideal situation is an auto printing service that allows you to customize and personalize all your receipts, invoices, delivery notes, and packing orders. Your printing service should also let you configure the location and time orders are printed for different scenarios. For example, some of your products may have different printing requirements: takeout coffee orders go to the barista, and lunch orders go to the kitchen. Or, you may need to print invoices and packing slips within specific time slots for delivery.
Lastly, your printing service has to be compatible with your existing printer. Often, this is something businesses forget to consider, and frustration follows. Look for a printing service compatible with multiple makes and styles of printers, and if you’re unsure, check with the printing service before you invest your time and money.
This is where we introduce BizPrint as the solution! It includes all the features mentioned above (and much more).
Introducing BizPrint
BizPrint is an auto printing WooCommerce plugin used most commonly by restaurants, retail stores, eCommerce merchants, and warehouses including fulfillment centers. It allows for the automatic printing of orders and receipts.
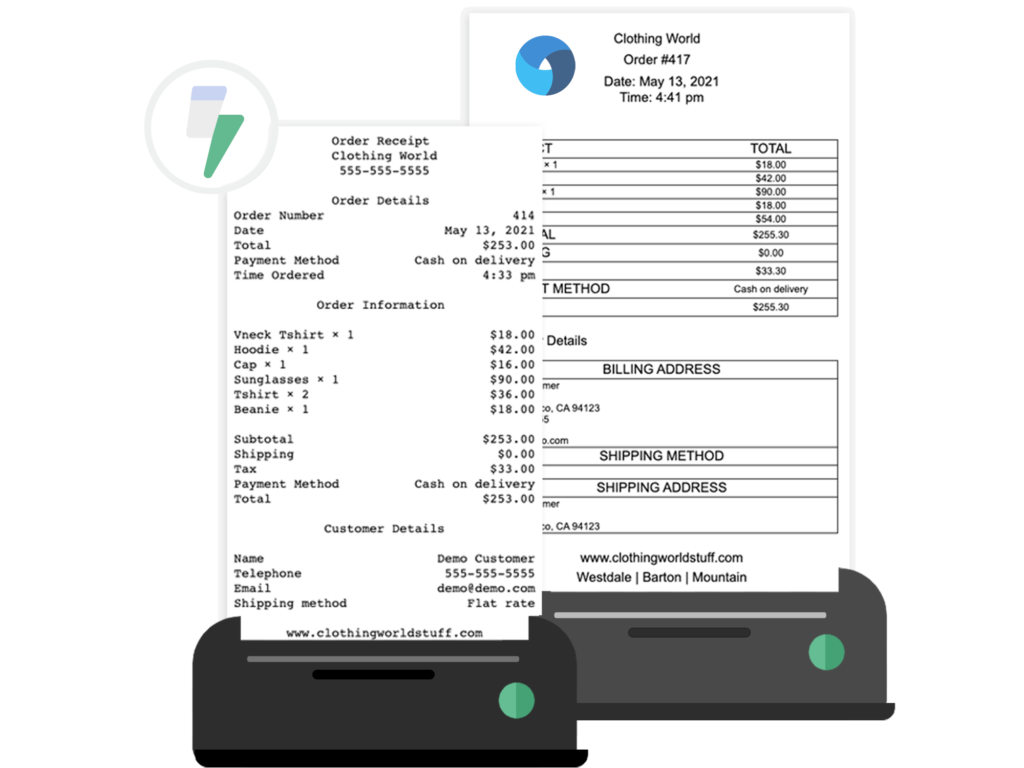
Print WooCommerce Order Receipts, Invoices & Labels
Automatically print from WooCommerce straight to your printer.
BizPrint lets you print what you want when you want, and you can do it all on your existing printer (including dot-matrix receipts on thermal printers, or any printer you already have). For example, you can print receipts or orders utilizing built-in print templates or get your own templates to meet custom requirements.
For advanced print workflows, BizPrint is available with a Product Mapping Add-on. This lets you get only specific WooCommerce categories (or specific products in WooCommerce) sent to specific print locations. Printing orders straight to the relevant fulfillment stations goes a long way to streamlining warehouse, POS, or kitchen operations!
Product mapping really lets you create advanced workflows: in a restaurant, for example, you could have a POS station printing out full customer receipts for the diner and get receipts printed in the kitchen with just the customer’s food order information. This kind of setup works wonders for reducing bottlenecks and streamlining operations.
Another useful plugin to combine with BizPrint is BizSwoop’s Pickup Delivery Scheduler. This allows you to set delivery time slots for customers to choose from. As a result, customers get total control over when they receive their delivery. This can also help to manage order fulfillment workflows by setting capacity levels. This way, delivery teams are more likely to meet delivery deadlines because they’re not overstretched.
Unlike the competition, BizPrint is an all-in-one solution from end-to-end. BizPrint takes your orders straight out of WooCommerce, to your local printer(s), and automatically prints the orders to your requirements. Fewer moving parts and fewer pieces of software results in the high reliability needed in a mission-critical workflow like automatically printing your WooCommerce orders.
You can get started with BizPrint by choosing the optimal plan for your store, depending on how many orders you’ll need to print per month. Whether you need to print 50 or 50,000+ orders, BizPrint have a plan that fits your needs.
How to Use the BizPrint Plugin, and Auto Print Woocommerce Orders
Getting started with BizPrint is simple and doesn’t require any coding knowledge (HTML, PHP, etc.). As we’ve discussed, you’ll need the plugin but no special equipment as BizPrint works with your existing printer.
Step 1: Install, Activate, and Setup BizPrint
You can install, activate, and setup BizPrint, and be auto printing your WooCommerce orders, in a couple of minutes. You’ll find a full step-by-step tutorial in our Print Setup guide.
Here, let’s quickly summarize what’s needed! You’ll need a BizPrint account, and access to the BizPrint Cloud Dashboard. Get the BizPrint Print Manager plugin for by going to Plugins > Add New, and searching for “Print Manager”. Alternatively, you can download the plugin ZIP directly here.
You then need to run through a couple of setup steps:
- Create your application within the BizPrint Cloud Dashboard.
- Note down the set of API keys you’ll need to verify and link your account with your WooCommerce install.
- Navigate to your print settings within the WooCommerce tab of your WordPress dashboard. Insert the public and secret keys as requested, and save.
Save all those changes. You’ll then be setup to auto print WooCommerce orders.
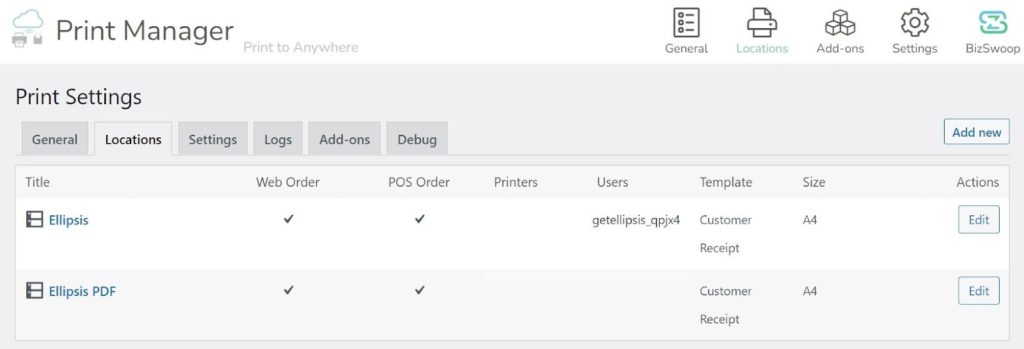
Step 2: Edit or Add New Locations and Select Printers
Click on the “Locations” tab found in the Print Settings area of BizPrint. From here, you can update existing locations with selected printers using the same print settings. Or you can create new locations by selecting other printers connected with BizPrint.
Now you’re set up to start printing orders directly from your website to your local printers.
Step 3: Activate Automatic Printing
If you want to use the automatic printing setting, select a local printer as your default printer. You can do this inside your printer settings on your Windows or macOS device.
For Windows:
- Select the Start button on your device
- Click on Settings
- Go to Devices > Printers & Scanners > Select A Printer > Manage. Then Select Set as Default.
For macOS:
- Select Apple Menu on your device
- Click on System Preferences
- Then click Printers & Scanners.
- Open Printers & Scanners preferences.
- Click the “Default printer” pop-up menu, then choose an option.
Automatic printing is triggered by Order Status: when a new order is placed through your WooCommerce store, it’s automatically tagged as “Processing,” and automatic printing occurs.
If you need to change the trigger for how you’re auto printing your WooCommerce orders, go to “WooCommerce > Print Settings > General”, and you can set up specific statues that trigger automatic printing. You can also change the number of print copies per order at that screen – useful if you’re using point of sale and need a copy for you and a copy for your customer.
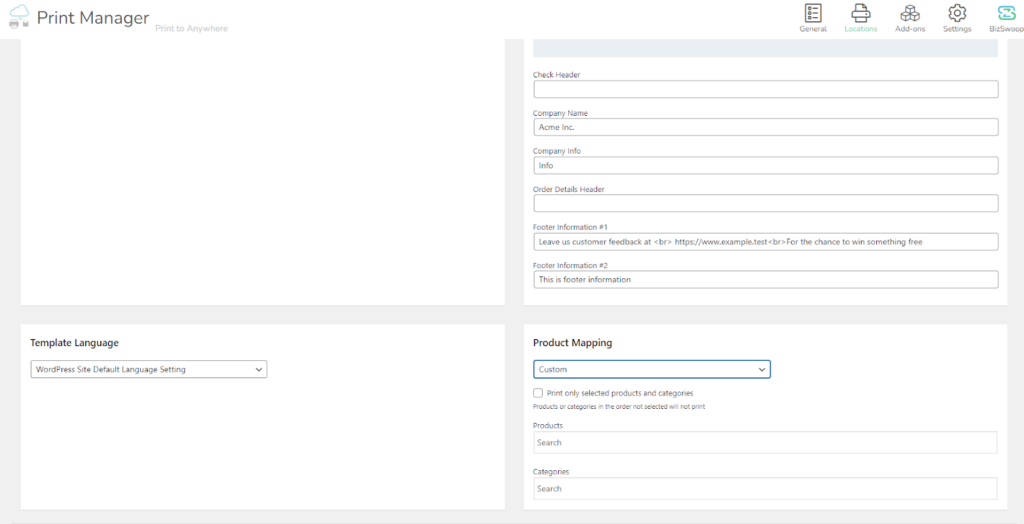
Using the Product Mapping Add-On
As discussed, the Product Mapping Add-on lets you send only specific order categories to specific printers. This is invaluable for complex workflows. Once you have activated the add-on, a product mapping section will appear under “Print Location.”
Navigate to your print settings in the WooCommerce section of your WP Dashboard and click on “Locations.” Once you click “edit” for the appropriate location, scroll down to find the product mapping settings. You can set this to custom and ensure it only prints selected products and categories so that the location only prints relevant receipts.
Using the Pickup Delivery Scheduler
The Pickup Delivery Scheduler is a separate plugin developed by BizPrint parent company BizSwoop, that enables you to schedule orders and pick-ups using smart scheduling. The Pickup Delivery Scheduler integrates seamlessly with BizPrint. However, as it’s a separate plugin, you’ll need to install and activate it following the same process in Step 1.
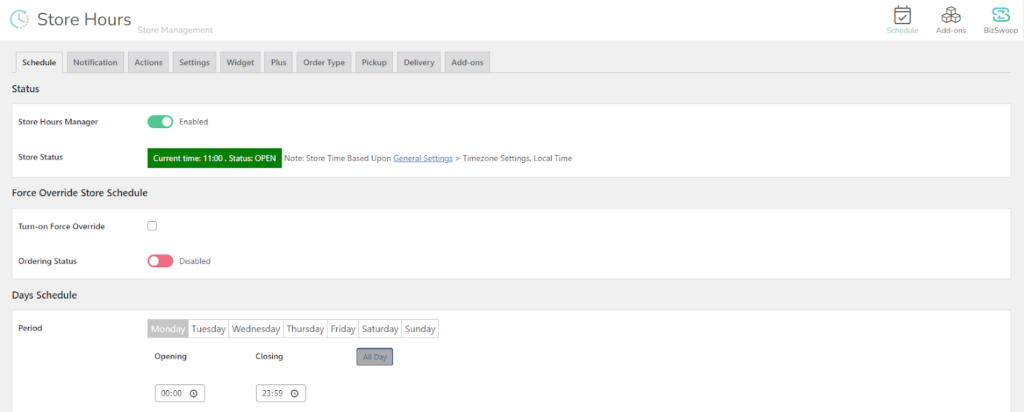
Once the plugin is active, you can find it under “WooCommerce” and “Store Hours” in your WP Dashboard.
From here, you can configure several settings.
- Your business’s opening and closing hours for each day of the week
- Whether to hide the “Add to cart” button when your store is closed
- The positioning and display settings for the store hour widget
- Which checkout order settings you permit (pickup, delivery, shipping) and when these are available
- Delivery zones
- Delivery costs
Optional step: Printing Manually
If you need to print manually, you can go to either your order list page under WooCommerce > Orders or the individual order details and click the print button. If you’re on the order list page, you may need to add the print column by going to “Screen Options” at the top of the page and ticking the “Print” checkbox.
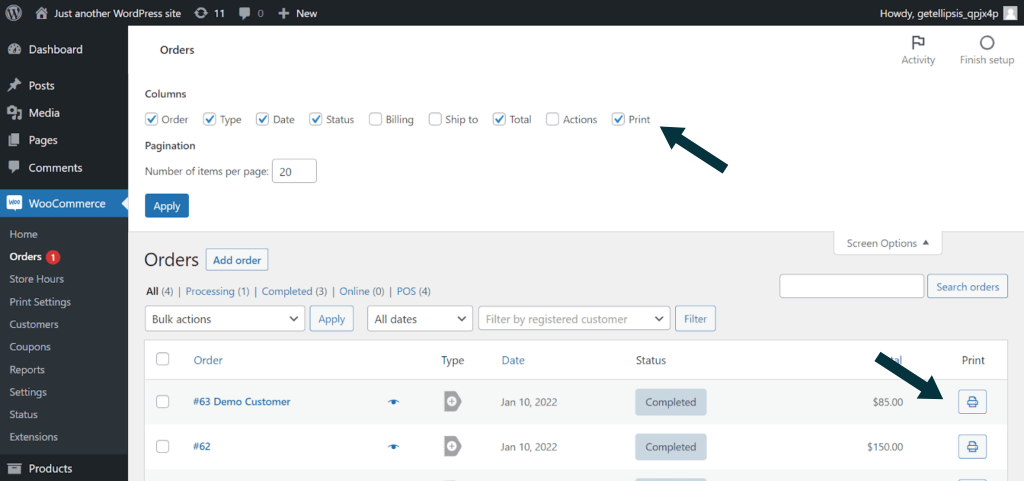
When you click to print manually, BizPrint will prompt you to choose the print location. Select the one you want, and the order will be printed.
Are You Ready to Auto Print WooCommerce Orders?
It takes an exemplary printing service to ensure that proof of purchase and order receipt printing is as efficient, automatic, and painless as possible. As a WooCommerce store owner, you can rely on BizPrint to autopilot this task, saving you lots of time and hassle.
Print WooCommerce Order Receipts, Invoices & Labels
Automatically print from WooCommerce straight to your printer.
BizPrint is an intuitive and powerful printing service that seamlessly integrates with WooCommerce to provide the best possible user experience. Plus, its robust features and add-ons offer granular control over where and how receipts are sent and printed.
Get BizPrint today to start auto printing your WooCommerce orders, however you need.