


Print Service
Why is Automatic Printing Not working?
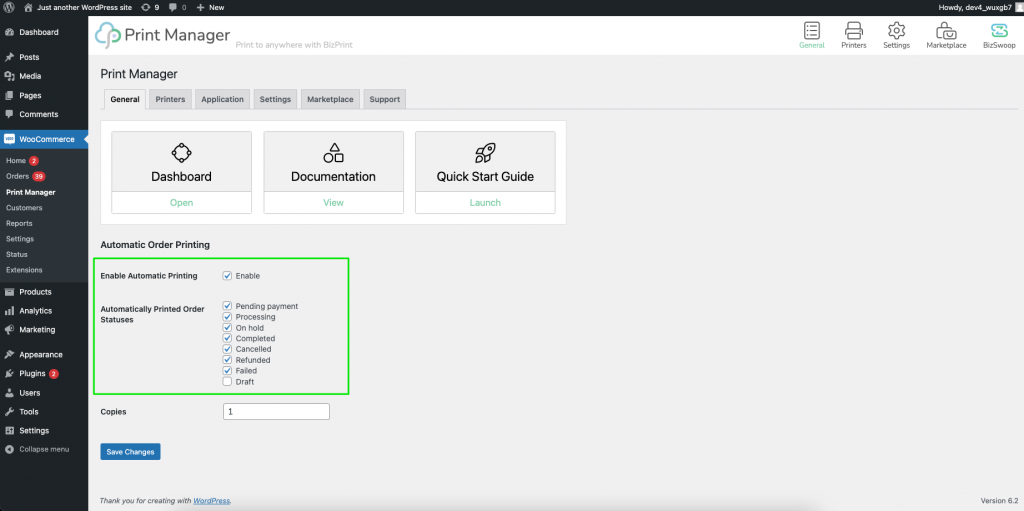
Under the General tab, please make sure you have enabled the Automatic print function. And selected the Order Status that is assigned to Orders on your WooCommerce store when the order is placed by Customers at checkout, as shown here.
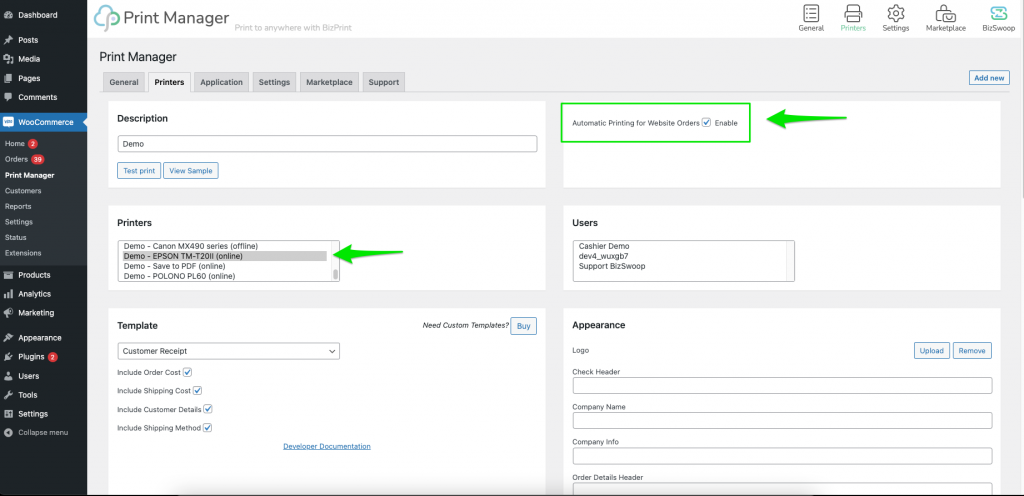
Next click Printers tab, select the Printer you added. Check to make sure you have enabled the automatic printing function for the printer, and the printer is selected by clicking on the printer in the list, as shown here
Scroll down, now click Save Changes.
After these steps have been checked, and enabled. Let’s try another test of the automatic printing functionality.
Printing has Stopped
The most common reason for printing stopping is the BizPrint app on the computer is not actively running. To start, go to the computer connected to the printer running the BizPrint app. You should see the BizSwoop icon in the taskbar. Click Open Settings. Select Disconnect. Connect the service again. This will refresh the connection. You should see the ‘Successfully Connected’ status. Try printing again. If the BizSwoop icon is not showing, this means the app is not running in the taskbar, launch the BizPrint app. Once launched verify the service has ‘Successfully Connected’. Once connected, try printing again.
Is BizPrint Cloud Print service free?
We have a Free Trial plan, allowing 25 prints. Once hit, the service will require the user to upgrade to a paid plan to continue using, such as a Pay-As-You-Print option or three monthly allocated print plans.
Will this work for my restaurant for pickup and delivery?
Yes. It works great for pickup and delivery!
Does it work with iOS and Android?
iOS & Android devices can send print jobs to Print Automator, but a computer is required to be connected to the printer.
What platform are supported?
We support Windows, MacOS, Linux and Raspberry Pi OS using a downloaded app. We will be evaluating and adding other OS platforms in the future. BizPrint currently connects to WordPress WooCommerce through the Print Manager Plugin.
Can I get support during the trial?
Yes! We provide full support to get the plugin setup during the trial and provide help for any issues.
Will my Cloud Print ready printer work with BizPrint Cloud Print Service?
We are working hard to provide support for many Printer Models and Types including thermal printers commonly used in restaurants. If the Printer Model can be connected to your Platform Windows, MacOS and Raspberry PI OS, the Printer Model should be supported. If you have a Printer Model not supported, open up a support ticket and we will evaluate the Printer Model and potential support.
Will the Plugin and BizPrint Cloud Print Service work with the BizSwoop POS?
Yes, the plugin and BizPrint Cloud Print Service will work with the BizSwoop Point of Sale app for cloud based printing solutions. Learn more about the BizSwoop Point of Sale system here: https://www.bizswoop.com/wp/pos/
How do I sign up or create an account for the BizPrint Cloud Print Service?
Get started by following the print setup guide here: https://getbizprint.com/quick-start-guide/ You will create an account and be printing in less than 5 minutes.
Print Connection Errors
Fix Error No Access - Connection Issue
Why did my print out show ‘Error No Access – Connection Issue’?
You are running a mismatch version of the API connection. You set the Application settings in your BizPrint account to REST API, and the Print Manager Plugin Application tab to Legacy API, or the reverse.
Our first recommendation, check the API settings you have configured. If you are not using the REST API connection type, please upgrade now from the Legacy API. This version will be discontinued later this year in 2023. Make sure under WooCommerce > Print Manager > Application tab you have selected the REST API option. And copied the keys from your BizPrint dashboard Application.
Fix Webhook Connection Issues
Why do I have a Webhook connection error?
This issue is linked to the Webhook URL. Follow a simple step by step video to getting Webhook URL setup correctly
Print Jobs
My Print Job Margins Are Cuttoff
Why is my print cutoff on the side?
This is a common issue if you have not set the Margins in the Print Manager location settings.
To fix the issue, enable the option ‘Custom Margins’.
We recommend trying the 5 mm margin to start. Perform a test print to view the layout and adjust the margin settings based upon the results.
Multiple Copies Are Printing
Why are Multiple Print Jobs printing?
If the printer is printing multiple copies, but you didn’t configure this setting. This means, you are running the app on your local Windows or Mac machine with multiple instances. Go to the task, right click. If you see more than 1 BizSwoop logo in the task. You have the app running multiple times. Close each instance until only 1 is active. This will resolve multiple print jobs from occurring.
Blank Space or Long Prints for MAC OS
Why are the prints really long with large spaces between the text
If you are using a Thermal Printer with the MAC OS, we recommend enabling CUPs Printer Interface and setting the correct Thermal Paper size. CUPS (formerly known as Common UNIX Printing System), is a network printing system that allows Mac OS devices to connect to various printers on a network, including Cash Drawers.
As the CUPS Web Interface may be disabled by default on your Mac, you will need to enable it in order to have your Thermal Receipt printers appear on the network.
To do this, you will first need to visit: http://localhost:631/printers/. A screen will then appear saying Web Interface is Disabled. An indication that CUPS has been disabled on your particular Mac device. To enable CUPS:
Select and copy ‘cupsctl WebInterface=yes’ from the page.
Then, use the search box in the top-right hand corner of your screen, and search for Terminal.
Once you are in Terminal, paste (Ctrl + V) in ‘cupsctl WebInterface=yes’ and hit Enter.
Now, once you go to http://localhost:631/printers/ you will see your installed printers.
To change the settings for your printer (or the cash drawer)and paper settings click the desired printer.
Why are customer emails being replaced with email protected?
Cloudflare, and other type Firewall services can obscure the email as part of spam protection, essentially adding that label. Either you are running Cloudflare or another plugin/service with an email obstruction filter active. Review your configuration, and see if that is true. If true, that configuration will need to be disabled.
Here is a post about the behavior:
https://wordpress.stackexchange.com/questions/354306/suddenly-all-emails-in-user-have-email-protected.
Printer Location Mapping Setup
✅ What You Need
| Component | Required? | Notes |
|---|---|---|
| BizPrint Core Plugin | ✅ | Already installed on your WordPress site |
| BizPrint Pro License | ✅ | Includes access to all Add-ons |
| Metadata Mapping Add-on | ✅ | Enables location-based printer routing |
| Any plugin storing location data in order metadata) | Optional | Many restaurant or pickup plugins already store a location field that can be used for mapping |
1. Download the Metadata Mapping Add-on
The Add-on is available through the BizPrint Extend Marketplace, which uses a separate login from your main BizPrint account.
-
At checkout, enter this code to make it free under your Pro license or separate purchase to any plan:
-
Complete the checkout (you may create a new username/password — it does not need to match your BizPrint account)
-
After checkout you will receive:
-
A ZIP file to install
-
A License Key via email
-
2. Install & Activate the Plugin
-
In WordPress, go to Plugins → Add New → Upload Plugin
-
Upload the downloaded ZIP file
-
Activate the plugin
3. Enter Your License Key
-
Go to WooCommerce → Print Manager → Settings
-
Locate the License / Activation section
-
Enter the License Email + Key provided in your email. Save & confirm activation
4. Map Printers to Locations
Once the license is active:
-
Go to WooCommerce → Printers
-
Click Edit on a printer
-
A new section called Metadata Mapping We’ll complete the configuration for you
Included Print Templates
Data Fields Are Missing?
Why are some information fields not printing?
At this time, we don’t have official plugin compatibility support for every available WordPress plugin and every meta field that can be created by a plugin or custom code. The challenge for us, there are many amazing plugins on from 3rd party developers both free and paid that provide a lot of great functionality to products, orders and checkout meta fields, unfortunately, we can’t support them all natively in the plugin by default as we don’t know how each plugin or code is developed and field names created.
Our first recommendation, shop our template store. We support several plugins and developers for the most popular plugins used.
If you don’t find your plugin or the developer supported share with us the Plugin you are using, we’d be happy to add the plugin to the list of plugins and in the future may provide support officially natively in the plugin or with add-ons, if more users indicate they use the plugin. We don’t have or provide timelines on compatibility support for requested plugins to add. Submit a plugin feature compatibility support
We know this doesn’t answer your questions, so what recommendation do you have to support other plugins or customer fields?
Our recommendation is to develop a Custom Print Template. Coding Required.
The Custom Print Template functionality for the Print Plugin would be the solution for any custom fields required to be added or removed to a print-out receipt template or compatibility with other plugins not supported by default in the print templates included.
We created a solution for developers so our plugin can be compatible with all these other great plugins, as a result, we developed the Custom Print Template functionality in a previous release for the Order Receipt Print Plugin. The print templates support a global $order variable, using $order->get_meta. This allows you to develop a Custom Print Template and add or remove all the fields you may require in the print-out receipt layout you want.
Important Note
For a quick solution, you can override a default print template under the /template directory of the plugin, but please be aware any future plugin updates will override the modified template. As a result, you would need to maintain a copy of the template. Plus, under this solution, we can’t guarantee the template format you modified will work in the future. We can commit to supporting the Custom Print Template solution in future releases as the correct solution for custom templates working with the plugin.
If you are a developer, you can review our developer documentation to build compatibility with the plugin for the fields you require on the print-out.
Are the BizPrint Templates built for WooCommerce?
Yes the templates allow WooCommerce order data to display on printed documents. For more compatibility check out the extension store for compatibility with popular 3rd party WordPress Plugins.
Okay I signed up for BizPrint, what now?
All standard print templates that display WooCommerce information are included in and are activated through the WordPress plugin. Follow the Quick Start Guide to setup BizPrint. Once complete, the information will start automatically showing on the receipt templates you select.
What if the template doesn't work?
Due to the nature of WordPress, sometimes problems can be complicated or unrelated to our direct plugin. We have helped over 50,000 businesses troubleshoot plugins in the last 2 years. Please contact our support team to discuss options.
How do I know if I need a template?
Templates aren’t for everyone. Core WooCommerce information will be printed on the included templates. If you want to add 3rd party fields from a plugin to your receipt you might need a plugin or template extension. We suggest you get started with the included templates first.
Are templates included with my plans?
Yes. We offer 10 templates with all plans. If you are using the Growth plan, included in the plan is full access to all templates. The other plans Basic, Plus, Pro you will need to buy templates separately.
Print Template Extensions
How do I use Print Template Extensions from the Marketplace
It’s easy! To Install and Activate Print Template Extensions, let’s follow these 5 steps:
Step 1: Purchase a template from the Marketplace.
Step 2: After the purchase, a plugin zip file will be available for download.
Step 3: Download the plugin zip file for the Print Template Extension.
Step 4: Go to WordPress Admin. Click Plugins. Click Add New. Upload Zip File.
Step 5: Install and Activate. Once activated, the Print Template Extension will automatically start showing fields on all print receipt templates.
Start printing with your new Print Template Extension. Yay!
How do I use the template extensions?
The templates are used to add support from 3rd party plugin fields on your receipts and invoices. Customers typically use the templates to add pickup or delivery time, product add-ons, and additional customer information. We currently have over 10 templates built for compatibility with 3rd party developers like WooCommerce YITH IconicWP SkyVerge Tychee Softwares CodeRockz Ex-themes WP Scripts and more. If you don’t see compatibility with a plugin you use, you can request a template here.
Are these templates a plugin?
These templates are a plugin for WordPress. Once you purchase, you will receive download instructions. If you ever have questions you can reach out to our support team.