

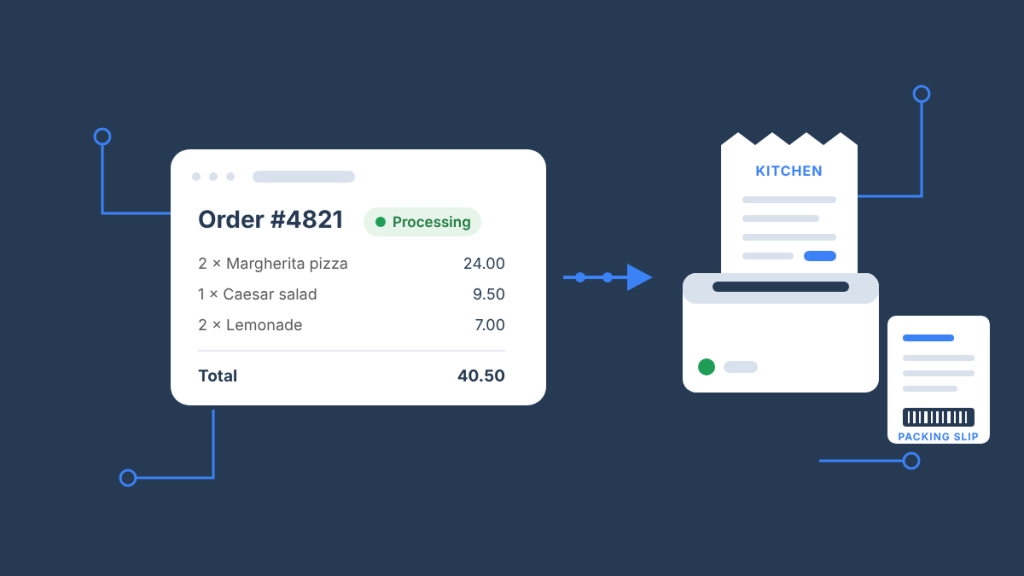
To automatically print WooCommerce orders, install the free BizPrint Print Manager for WooCommerce plugin, connect a print station to the printer, and turn on a status trigger, so that every order that reaches Processing (or any status you choose) prints itself as a receipt, kitchen ticket, packing slip, invoice or label, with no browser dialog and nobody clicking Print. WooCommerce has no built-in printing of any kind, so WooCommerce automatic order printing always means adding a plugin that watches order statuses and hands the document to a printer. This guide explains the whole system (triggers, templates, stations, printers), walks through the six-step setup, compares every option, including the official WooCommerce extension and the free Printus plugin, and ends with a troubleshooting table.
Last updated October 2026.
Key Takeaways
- WooCommerce cannot print orders on its own. The orders screen lets you view orders or export them; any automatic printing comes from a plugin that reacts to an order status change.
- Status triggers are the mechanism. A WooCommerce order moves to Processing the moment payment clears, and that status change is what fires the print job; you can also trigger on Completed, On hold or a custom status.
- Cloud printing replaces the browser dialog. With BizPrint the plugin sends the job to BizPrint Cloud, a station app on a Windows, macOS, Linux, Raspberry Pi OS or Android device at the location receives it, and the printer prints it, even when no one is logged in to WordPress.
- One order can print several documents to several printers. Locations pair a template with a printer, so a single order can produce a kitchen ticket at the pass, a receipt at the counter and a packing slip in the warehouse, with product and category mapping deciding which items go where.
- Setup is six steps and under an hour. Install the plugin, create a free BizPrint account, connect a station, add the printer, choose a template and pick the trigger status; the first 25 prints are free with no card.
- BizPrint is not the only option, and sometimes not the right one. The official Automatic Order Printing extension (PrintNode or PrintTrigger) and the free Printus plugin (PrintNode) also work; for a handful of orders a week, a PDF invoice plugin and the browser dialog may be all you need.
What can you print automatically from a WooCommerce order?
You can automatically print any document that WooCommerce order data can fill: customer receipts, kitchen tickets, packing slips, invoices, pick lists, delivery notes and shipping or product labels. The plugin renders the order through a template and sends the result to whichever printer the location points at, so the same order can produce different documents for different people.
| Document | Who it is for | Typical printer | Usual trigger | What the template shows |
|---|---|---|---|---|
| Customer receipt | The shopper (counter, pickup bag, delivery) | 80 mm thermal receipt printer | Processing | Items, prices, totals, payment method, store branding |
| Kitchen ticket | Cooks and bar staff | Thermal printer at the pass | Processing | Items and quantities, modifiers and add-ons, pickup or delivery time, no prices |
| Packing slip | Pickers and packers | Letter/A4 laser or inkjet, or a wide thermal | Processing (or a custom “Ready to pack” status) | Items, SKUs, quantities, shipping address, order notes |
| Invoice | Accounting, B2B customers | Letter/A4 | Processing or Completed | Full line items, tax, billing details, order number |
| Pick list | Warehouse staff | Letter/A4 or thermal | Processing | Items, bin or shelf references where available, quantities |
| Delivery note | Drivers and couriers | Thermal or Letter/A4 | Processing or a “Out for delivery” status | Address, contact number, items, delivery slot |
| Label | Parcels, bags, product packaging | Label printer | Processing or Completed | Address, order number, barcode or QR code |
The Print Manager plugin ships with templates for receipts, invoices, pick lists and pickup and delivery documents, each with your logo and store details, and prints in more than 36 languages. Receipts are the most common starting point, and the WooCommerce receipt printing guide covers receipt-specific template choices. If a template needs fields from another plugin (a delivery-slot plugin, product add-ons, a food-ordering menu), the marketplace carries template extensions for the common ones, and the developer documentation shows how to register your own; both are covered below.
How does status-based automatic printing work in WooCommerce?
Status-based automatic printing works by listening for a WooCommerce order status change and sending the order to a printer the instant the order enters a status you have selected. Nothing is scheduled or polled: the trigger is the status transition itself, which is why a print appears within seconds of checkout.
WooCommerce assigns statuses on its own as an order moves through its life. Per the WooCommerce order statuses documentation, an order is Pending payment until the gateway responds, becomes Processing when payment has been received and stock has been reduced, and is set to Completed, usually by you, once it has been fulfilled. On hold means payment is still being confirmed (bank transfer, cheque, some delayed-notification gateways), and Failed, Cancelled and Refunded are the exits. Because Processing is the first status that means “this is a real, paid order”, it is the default trigger for almost every store.
| Trigger status | When WooCommerce sets it | Print this on it | Who uses it |
|---|---|---|---|
| Processing | Automatically, the moment payment clears | Kitchen ticket, receipt, packing slip, pick list | Restaurants, retail, most e-commerce |
| On hold | Automatically for offline or delayed-confirmation payments | Kitchen ticket (if you cook before payment confirms), nothing for mail-order | Restaurants taking pay-at-pickup orders |
| Completed | Manually when you mark the order fulfilled, or automatically for some fully virtual orders | Invoice, shipping label, delivery note | Warehouses, B2B stores, delivery operations |
| Custom status (e.g. “Ready to pack”, “Out for delivery”) | Set by you, a fulfillment plugin or an automation | Packing slip, delivery note | Multi-stage fulfillment |
| Pending payment | Automatically at checkout, before payment | Normally nothing | Avoid: unpaid orders would print |
The chain from checkout to paper has four parts, and understanding them is most of understanding any cloud print setup:
| Stage | Where it lives | What it does |
|---|---|---|
| Trigger | The Print Manager plugin on your WordPress site | Watches order status changes; when an order enters a selected status it builds the print job |
| Template and location | The plugin’s Locations settings | Decides which document is produced, how it looks, and which printer it goes to; product and category mapping filters the items |
| Station | The BizPrint app on a computer, Raspberry Pi or Android device at the location | Stays connected to BizPrint Cloud, receives the job and passes it to the operating system’s printer |
| Printer | The physical receipt, label or office printer | Prints the document; ESC/POS and StarPRNT receipt printers are the common choice for tickets and receipts |
The important consequence is that nobody has to be logged in to WordPress, nobody has to have a browser open, and the computer at the store can be a spare laptop or a Raspberry Pi in a cupboard. That is the difference between automatic order printing and the “print” button in a PDF invoice plugin, which still needs a human at a screen.
How do I set up WooCommerce automatic order printing with BizPrint?
You set up automatic printing in six steps: install the plugin, create a free BizPrint account, connect a station, register the printer, add a location with a template, and switch on the status trigger. The order of these steps matters, because the station must be connected before the plugin can list your printers. The steps follow BizPrint’s Quick Start Guide, which rates the whole process as under five minutes once you have the printer attached.
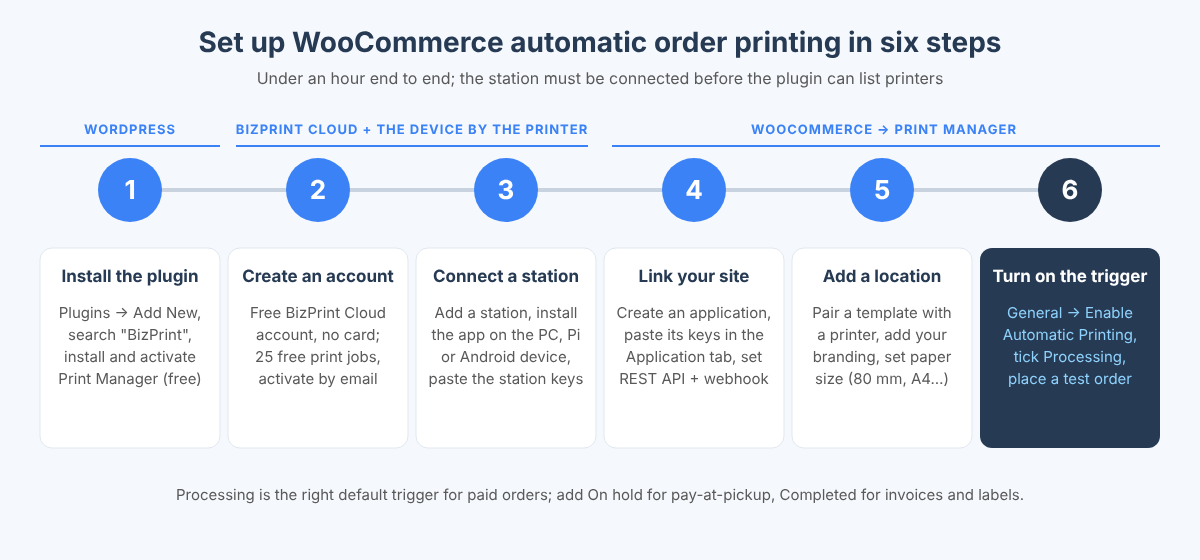
Step 1: Install the BizPrint Print Manager for WooCommerce plugin
- In WordPress admin, go to Plugins → Add New.
- Search for “BizPrint” (the listing is titled “Print Anywhere & Create PDFs of Order Receipts, Invoices, Labels & More”, by BizSwoop; the current version at the time of writing is 4.9.5).
- Click Install Now, then Activate.
- You will find the plugin’s settings under WooCommerce → Print Manager. Leave it for now; the next three steps happen in the BizPrint Cloud dashboard.
The plugin is free. It needs a BizPrint Cloud account to send jobs to, which is what the next step creates.
Step 2: Create a free BizPrint Cloud account
- Create your account. No card is required, and the account comes with 25 free print jobs.
- Activate it from the email you receive (check spam; you have 15 days).
- You land on the BizPrint dashboard, which shows connected stations, printers, websites and your print-job history.
BizPrint charges per successful print job after the free prints, and the WooCommerce plugin is included from the Plus plan; the current plans are on the pricing page. There is also a development mode that lifts the 25-print limit while you test.
Step 3: Set up a print station on the computer or device next to the printer
A station is the bridge between the cloud and the printer: a small app that stays connected to BizPrint and prints whatever arrives.
- In the BizPrint dashboard, open Stations and click the + button.
- Give the station a name that says where it is (“Kitchen Pi”, “Front counter iMac”, “Warehouse PC”) and create it.
- Copy the station’s public and secret keys.
- On the device attached to the printer, install the BizPrint app from the download page: Windows (32- and 64-bit), macOS (Intel and Apple Silicon), Linux x64, Linux ARMv7 and ARMv8 (the builds that run on a Raspberry Pi), or the Android app from Google Play.
- Launch the app, click Connect, paste the station’s public and secret keys, and click Submit. The app reports “Successfully Connected”, and every printer installed on that device appears under the station in your dashboard.
The device must stay on and online; the station app runs in the background (in the system tray on Windows and macOS). If you want the computer to do nothing else, a Raspberry Pi or a cheap Android tablet is the usual answer, and both are covered in the compatibility section below.
Step 4: Connect your WordPress site to BizPrint (Application keys and webhook)
- In the BizPrint dashboard, open Applications and create one: give it a name and enter your WordPress site URL. Copy its public and secret keys.
- Back in WordPress, go to WooCommerce → Print Manager → Application and paste the application’s public and secret keys.
- Set the API version to REST API (BizPrint recommends it for new installs). The plugin now shows a webhook URL; copy it.
- Return to the application in the BizPrint dashboard and paste the webhook URL into its webhook field. Save both sides.
Your site is now a connected website in the dashboard, and the plugin can see every printer on every station in your account.
Step 5: Add a location: pair a template with a printer
A location is BizPrint’s word for “this document goes to this printer, looking like this”. Most stores start with one and add more as they discover they want a kitchen ticket and a receipt from the same order.
- Go to WooCommerce → Print Manager → Locations and click Add New.
- Name the location after the job it does (“Kitchen tickets”, “Counter receipts”, “Packing slips”).
- Select the printer from the dropdown; the list is the printers your stations reported in step 3.
- Choose a template (the order or kitchen ticket template for the pass, the customer receipt for the counter, the invoice or packing-slip template for fulfillment), then tick which details to include: customer information, product details, shipping method, payment information.
- Add your company name, address and logo under the appearance settings, and set page orientation and layout size to match the paper (80 mm for most receipt printers, Letter or A4 for office printers).
- Save. You can test immediately from any order (see the manual printing note below) before you turn on automation.
Step 6: Turn on automatic printing and choose the trigger status
- Go to WooCommerce → Print Manager → General.
- Tick Enable Automatic Printing.
- Tick the order status or statuses that should trigger a print. Processing is the right default for paid orders; add On hold if you take offline payments and want the kitchen to start cooking before the payment is confirmed, or Completed if you want invoices or delivery notes at fulfillment time.
- Set the number of copies per order if you need more than one (a counter receipt for the customer and one for the till drawer, for example).
- Open the Printers tab, confirm the printer you selected in your location has automatic printing enabled, and Save Changes.
- Place a test order. It should print within seconds of the status change.
That is the whole setup. The sections that follow cover routing different items to different printers, templates, hardware, the alternatives, and what to check when nothing prints.
How do I send different products to different printers?
You send different products to different printers with product and category mapping, which is configured per location and filters the items that location prints. A restaurant is the clearest example: the kitchen location is mapped to the Food category and prints only food items, the bar location is mapped to Drinks, and the counter location has no mapping and prints the full receipt.
- Edit the location under WooCommerce → Print Manager → Locations.
- Scroll to the product mapping section and switch it from “all products” to custom.
- Select the categories, or individual products, that this location should print.
- Save, then repeat for each station.
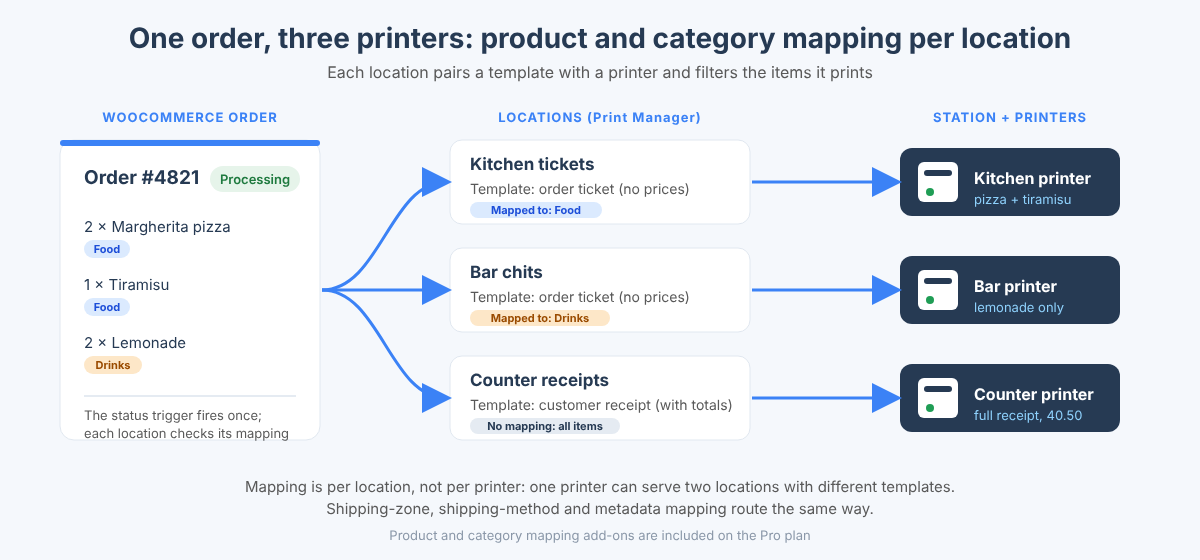
Two things are worth knowing before you plan around mapping. First, mapping is per location, not per printer, so one physical printer can serve two locations with different templates and different mappings (a kitchen printer that prints a prep ticket for hot food and a separate chit for desserts). Second, the plugin also supports mapping by shipping zone and shipping method, which is how a store with two warehouses routes an order to the warehouse that will ship it, and how a restaurant separates delivery tickets from pickup tickets. The mapping add-ons are included on the Pro plan; the pricing page lists what each plan includes. If you run several physical stores on one WooCommerce site and need orders routed by a pickup-location field written by another plugin, the Metadata Mapping add-on reads that order metadata and routes on it; the documentation has the setup.
Which WooCommerce order statuses should trigger printing?
Processing should trigger printing for almost every store, because it is the first status that guarantees the order is paid and stock has been reserved. The other statuses are for specific workflows, and choosing them deliberately is what stops the kitchen from cooking unpaid orders and the warehouse from packing cancelled ones.
| Your situation | Trigger on | Why |
|---|---|---|
| Restaurant or café, card payments online | Processing | Payment has cleared; the ticket should hit the kitchen immediately |
| Restaurant with pay-at-pickup or cash on delivery | On hold (and Processing) | WooCommerce puts offline-payment orders On hold, and the kitchen still needs the ticket |
| Retail store, receipts for pickup orders | Processing | The receipt goes in the bag when the order is picked |
| Warehouse, packing slips | Processing, or a custom “Ready to pack” status | Pack when the order is paid, or when a picker has confirmed stock |
| Shipping labels and invoices | Completed | The label is needed when the parcel is sealed, and Completed is set at that moment |
| B2B store on invoice terms | Processing for the packing slip, Completed for the invoice | Different documents at different stages |
| Store that takes pre-orders or backorders | A custom status set when stock arrives | Avoids printing a packing slip weeks before it can be fulfilled |
Custom statuses come from plugins such as order-status managers and fulfillment tools; once they exist, they appear in the plugin’s trigger list like any core status. If a status you want to print on is set by a scanner rather than a person, BizPrint’s Order Status Triggers add-on (included from Plus) prints a barcode on each document and updates the order status when the barcode is scanned, which turns “printed, picked, packed” into three status changes without anyone touching the admin screen.
Ready to print WooCommerce orders automatically? Every BizPrint account starts with 25 free print jobs, no card required.
How do templates and the zprint hook system work?
Templates decide what a document says and how it looks, and the zprint hook system lets a developer add data to an included template without editing it. For most stores the included templates, plus your logo and store details, are the finished product; the hooks exist for the minority of stores whose orders carry fields from other plugins that the templates do not know about.
The included templates print core WooCommerce data: items, quantities, prices, totals, billing and shipping details, order notes, payment method and your branding. They render in both HTML (for office and receipt printers) and plain-text formats. When another plugin stores something you need on the ticket (a delivery time slot, a table number, product add-on choices, a food-menu modifier), there are three routes, in order of effort:
- A template extension from the marketplace. BizPrint publishes extensions for common plugins (product add-ons, pickup and delivery scheduling, food ordering); they install as plugins and the data appears on the ticket. The documentation lists the supported plugins, and template compatibility extensions are included on the Pro plan.
- A request for support. If your plugin is not covered, BizPrint takes requests for new template support through its support portal.
- A custom template or a hook. The developer documentation describes a registration API (
ZprintTemplates::registerTemplate()inside thezprint_loadedaction) for full custom templates, and a set of actions and filters for adding to the included ones. The global$orderobject is available in every template, so any order meta can be read with$order->get_meta().
The hooks follow a naming pattern of Zprint{template}-{format}{position}, where the template is customer, details or order and the format is html or plain. This example appends a delivery-slot line stored in order meta to the end of the HTML order ticket; adapt the meta key to whatever your scheduling plugin writes:
<?php
// Add a custom order meta value to the end of the HTML order (kitchen) template.
// Hook names and the $order global are documented at
// https://getbizprint.com/documentation/developer/
add_action( 'Zprinttemplatesorder-htmlend', function ( $order_id ) {
    $order = wc_get_order( $order_id );
    if ( ! $order ) {
        return;
    }
    $slot = $order->get_meta( '_delivery_time_slot' ); // change to your plugin's meta key
    if ( $slot ) {
        echo '<p><strong>Delivery slot:</strong> ' . esc_html( $slot ) . '</p>';
    }
} );
Put code like this in a small site plugin or your child theme’s functions.php. Do not edit the files in the plugin’s own templates directory: the documentation warns that plugin updates overwrite them.
Which printers and devices work with WooCommerce automatic printing?
Any printer that the station’s operating system can print to works, because the station hands the job to the OS print system rather than talking to the printer directly. BizPrint’s hardware page puts it as “if it prints, it works”, and the station app runs on Windows, macOS, Linux, Raspberry Pi OS and Android. The practical choice is which printer for which document, and which device to run the station on.
| Printer type | Best for | Paper | Connection to the station | Notes |
|---|---|---|---|---|
| Thermal receipt printer (ESC/POS, e.g. Epson TM series and compatibles) | Receipts, kitchen tickets, pick lists | 80 mm (sometimes 58 mm) rolls | USB, Ethernet, Wi-Fi, Bluetooth | The industry standard at the pass and the counter; quiet, fast, no ink. Kitchen models take heat better than counter models |
| Thermal receipt printer (StarPRNT, Star Micronics) | Receipts, kitchen tickets | 80 mm rolls | USB, Ethernet, Bluetooth | Same job as ESC/POS; a different command language the station handles for you |
| Label printer (direct thermal) | Shipping and product labels, bag labels | 4×6 in and smaller label stock | USB, network | Use a label template and set the layout size to the label |
| Office laser or inkjet | Packing slips, invoices, delivery notes | Letter or A4 | USB, network | Cheapest per page for full-size documents; the same printer can serve several locations |
| Dot-matrix or impact kitchen printer | Kitchens with high heat and steam | Ribbon and plain roll | USB, serial via adapter, network | Thermal paper fades near heat; impact printers do not |
| Station device | When to use it | What to know |
|---|---|---|
| Windows PC or Mac already at the counter | The common default; the computer is there anyway | The app lives in the system tray; make the computer stay awake and set the printer up in the OS first |
| Linux desktop | Stores that already run Linux at the till | x64 AppImage |
| Raspberry Pi (ARMv7/ARMv8 AppImage) | A dedicated, cheap, always-on station in a kitchen or warehouse | Boots to the station app; no monitor needed once configured |
| Android phone or tablet (Google Play app) | Kitchens and food trucks without a computer; ESC/POS and StarPRNT receipt printers | The device becomes the print host for the printers connected to it |
| iPhone or iPad | Not as a station | iOS does not allow the background service the station needs; iOS devices can still place and manage orders |
Three practical rules save most hardware support tickets. Set the paper width in the location’s layout size to match the printer, or receipts will be cut off or print in a narrow column. Install the printer in the operating system and print a test page from the OS before connecting the station; if the OS cannot print, BizPrint cannot either. And for an unusual model, open a ticket with BizPrint support before buying; the hardware page says the list of logos is not exhaustive, and support will confirm a model.
What are the alternatives to BizPrint for printing WooCommerce orders?
The alternatives are the official Automatic Order Printing for WooCommerce extension, the free Printus plugin, PDF invoice and packing-slip plugins that print through the browser, and doing nothing automatic at all; each is the right answer for some stores. Being honest about that is the only way to recommend anything, so here is how they compare.
| Option | How it prints | Cost structure | Triggers | Routing by product or location | Station platforms | Best for |
|---|---|---|---|---|---|---|
| BizPrint Print Manager for WooCommerce | Cloud print service with its own station app | Free plugin; pay per successful print job after 25 free; plugin from Plus (pricing) | Any order status, incl. custom; copies; barcode status triggers | Product, category, shipping zone/method and order-metadata mapping | Windows, macOS, Linux, Raspberry Pi OS, Android | Restaurants, multi-printer retail, warehouses, anyone who also wants the API or an agent to print |
| Automatic Order Printing for WooCommerce (official Woo Marketplace extension) | Through PrintNode or PrintTrigger, chosen in settings; you need an account with the service | Annual extension fee plus a PrintNode or PrintTrigger subscription | Prints when the order is placed (docs) | Several templates, each tied to a printer and copy count | PrintTrigger: Windows 10+ and macOS 11+; PrintNode: its desktop client | Stores that prefer buying through the Woo Marketplace and already use PrintNode |
| Printus – Automatic Cloud Order Printing (WordPress.org) | Through the PrintNode API; needs a PrintNode account | Free plugin; PrintNode has a free tier and paid plans; PRO version adds printer mappings | Order statuses (Processing, On hold, Completed) | Printer mapping per document type in PRO; no product/category mapping described | Any computer running the PrintNode client, including Raspberry Pi | Small stores with one printer and simple needs |
| PDF invoice and packing-slip plugins (e.g. WooCommerce PDF Invoices & Packing Slips, WooCommerce Print Invoices & Packing Lists) | Generate a PDF or a print view; you press Print in the browser, or the customer gets the PDF by email | Free or annual fee | None automatic to a printer; email attachments can be automatic | n/a | Any browser | Stores that need invoices as files more than as paper |
| No plugin | Open the order, use the browser’s Print | Free | None | n/a | Any browser | A few orders a week, printed when convenient |
Where the official extension and Printus fall short of BizPrint is mapping and hardware: neither routes items by product or category to different printers, both depend on a desktop client (Android is not an option), and neither connects to a print API or an MCP server, so the printing you set up for WooCommerce cannot later be reused by a custom app or an AI agent. Where they beat BizPrint: the official extension is one line on your Woo Marketplace invoice, and Printus plus PrintNode’s free tier costs nothing at low volume. BizPrint vs PrintNode: Which Print API for Your App goes into the API side of that comparison.
When do you not need automatic order printing?
You do not need automatic order printing when nobody is waiting on the paper. If orders are fulfilled in batches once a day from a screen, a PDF packing-slip plugin and a bulk “print” action on the orders list are enough, and the browser dialog is not a bottleneck. If you ship everything through a carrier platform that prints its own labels, you may only want invoices, and those can go to the customer as PDF attachments with no printer at all. Automatic printing earns its keep when the gap between “order placed” and “someone acts on it” is measured in minutes (kitchens, pickup counters, same-day fulfillment) or when the printer is in a different room from the person managing orders.
How do I troubleshoot WooCommerce orders that are not printing?
Start at the end of the chain and work backwards: is the printer on and online in the OS, is the station app running and connected, is the location pointing at that printer, and is the trigger status the one the order actually entered. Nearly every “nothing printed” report resolves at one of those four points. The table collects the cases from BizPrint’s documentation and from the support patterns behind this guide.
| Symptom | Most likely cause | Fix |
|---|---|---|
| Nothing prints, ever | Automatic printing is off, or the trigger status is not ticked | WooCommerce → Print Manager → General: tick Enable Automatic Printing and the status; then the Printers tab: confirm automatic printing is enabled for that printer; Save |
| Printed yesterday, stopped today | The station app is not running (computer rebooted, user logged out, sleep) | Look for the BizSwoop icon in the tray; open it, Disconnect and reconnect until it shows Successfully Connected; set the computer not to sleep |
| Prints only when I press the Print button | The order never reached the trigger status (e.g. it is On hold because the payment is offline, and only Processing is ticked) | Check the order’s status in WooCommerce; add On hold to the triggers or move the order to Processing |
| Every order prints twice | The station app is running twice on the same computer, or the copies setting is 2 | Close extra instances from the tray; check Copies on the General tab |
| Right side of the receipt is cut off, or text is in a narrow column | Layout size does not match the paper width | Edit the location: set layout size to 80 mm (or your paper); set orientation; reprint |
| Long blank space or an extra page after each receipt (macOS) | Page size set to Letter/A4 for a roll printer | Set the location layout size to the roll width; check the OS printer’s default paper size |
| Kitchen ticket shows drinks, or the bar ticket shows food | Product mapping on the location is set to all products | Edit each location’s mapping to the right categories |
| The ticket is missing the delivery slot, table number or add-on choices | The included template does not know that plugin’s fields | Install the template extension for the plugin, request support, or add a hook (see the templates section) |
| “No access” or connection error in the plugin | Application keys or webhook URL are wrong, or the site URL changed | Re-copy the application’s public and secret keys and the webhook URL; confirm the site URL in the application matches your site |
| Webhook errors in the plugin, prints delayed | The site’s REST API is blocked by a security plugin or a firewall, or WP Cron is disabled | Allow the BizPrint webhook route; the documentation’s webhook connection page lists the checks |
| Customer email prints as “[email protected]” | Cloudflare email obfuscation is rewriting addresses in the rendered template | Disable email address obfuscation for the site in Cloudflare |
| Printer prints gibberish or a few characters | The OS driver is wrong for the printer’s command language | Install the manufacturer’s driver (ESC/POS or StarPRNT) in the OS and test from the OS before BizPrint |
If a job shows as sent in the BizPrint dashboard but never appears on paper, the problem is between the station and the printer (driver, cable, sleeping computer); if the job never appears in the dashboard, the problem is between WordPress and BizPrint (trigger, keys, webhook). That split is the fastest way to know which half of the chain to inspect.
Can the same printing setup be used outside WooCommerce?
Yes: the stations and printers you connect for WooCommerce are the same stations and printers that BizPrint’s Print API and MCP server use, so a custom app or an AI agent can print to them without any new hardware. The WooCommerce plugin is one way of creating print jobs; the Print API guide shows how an app creates them with one signed request, and the MCP server guide shows how an agent such as Claude does the same through a tool call. Both are included on every BizPrint plan. The MCP server is open source and runs locally (as a Claude Desktop extension or a local server); there is no hosted version. For stores that outgrow the plugin’s templates or need printing from a kiosk, a POS or an ordering app, From WooCommerce Plugin to Print API: When to Go Custom walks through when that move makes sense.
Frequently asked questions
How do I automatically print WooCommerce orders?
Install the free BizPrint Print Manager for WooCommerce plugin, create a BizPrint Cloud account, connect the BizPrint station app on the computer or Android device attached to your printer, add a location that pairs a template with that printer, and tick Enable Automatic Printing plus the Processing status under WooCommerce → Print Manager → General. Every paid order then prints on its own; the full six steps are above.
How to set up automated printing?
Automated printing needs three things: a trigger (a WooCommerce order status change), a document (a template filled with the order), and a path to the printer that does not depend on a browser (a cloud print service with a station app next to the printer). Set up the station first, then the plugin, then the trigger; the setup section of this guide walks through each in order.
How to print orders in WooCommerce?
Manually, open any order (or the orders list with the Print column enabled under Screen Options) and click Print, then choose the location; automatically, enable a status trigger so the order prints when it is paid. WooCommerce itself has no print feature, so either route needs a printing plugin.
Can WooCommerce print orders automatically without a plugin?
No. WooCommerce can display orders and export them as CSV, and some email plugins can attach a PDF, but nothing in core sends anything to a printer. Automatic printing to a physical printer always comes from a plugin plus a print service or a connected computer.
Does BizPrint work with a kitchen printer for a restaurant?
Yes; restaurants are BizPrint’s most common use. A location mapped to your food categories prints kitchen tickets on a thermal printer at the pass the moment an order is paid, a second location can print bar tickets, and a third can print the customer receipt at the counter. The station can be a Windows or Mac machine, a Raspberry Pi or an Android tablet in the kitchen; Restaurant Ordering with WooCommerce and Automatic Kitchen Tickets covers the restaurant setup end to end.
What is the difference between BizPrint and PrintNode for WooCommerce?
PrintNode is a general-purpose cloud print service that plugins such as Printus and the official Automatic Order Printing extension send jobs through; BizPrint is a commerce-specific service that ships its own WooCommerce plugin, templates, status triggers and product, category and shipping mapping, plus a Print API and an MCP server on the same account. If you only need “send this PDF to that printer”, PrintNode-based plugins work well; if you need order-aware routing, several documents per order, or Android stations, BizPrint is built for it.
Can I print packing slips automatically in WooCommerce?
Yes. Add a location that uses the packing-slip or invoice template, point it at a Letter or A4 printer (or a wide thermal printer), and trigger it on Processing or on a custom “Ready to pack” status. If you also want a kitchen or counter document from the same order, add a second location; one order can print to as many locations as you define. Best WooCommerce Packing Slip and Invoice Plugins (2027) compares the packing-slip options, including the PDF plugins.
Which thermal printers work with WooCommerce automatic printing?
Any thermal receipt printer that your station’s operating system can print to, which in practice means the ESC/POS printers (Epson TM series and the many compatibles) and Star Micronics StarPRNT printers that restaurants and shops already use, over USB, Ethernet, Wi-Fi or Bluetooth. Set the location’s layout size to the paper width. WooCommerce Thermal Printer Setup: ESC/POS and StarPRNT goes into models, drivers and paper.
Is there a free way to print WooCommerce orders automatically?
Partly. The BizPrint plugin is free and the first 25 print jobs are free with no card, which is enough to set up and test; after that it is pay per print. Printus is a free plugin that uses PrintNode, which has a free tier at low volume. Both need a computer or device that stays on next to the printer. For anything beyond a handful of prints a month, compare the per-print and subscription costs on the pricing page and PrintNode’s site rather than assuming free stays free.
Will my store handle holiday order volume with automatic printing?
Automatic printing is one of the first things to check before a peak season, because a kitchen or warehouse that depends on paper cannot absorb a station that goes offline at the busiest hour. Keep a second station device ready, confirm the computer never sleeps, keep spare paper rolls at every printer, and test the trigger after any WooCommerce or plugin update. Prepare Your WooCommerce Kitchen and Fulfillment for Holiday Order Volume is the pre-season checklist.
Get your WooCommerce orders printing themselves
Automatic order printing is the one piece of store automation that reaches past the screen into the kitchen, the counter and the packing bench, and it takes an afternoon to set up. Install the plugin, connect a station, pick a template and a trigger, and the next order prints itself. Get 25 prints free, no card required, or see pricing for the plan that fits your print volume.
